2020 July update
I wrote this a while ago, and I’d like to think that my knowledge of working with *nix systems have since grown a lot since then. Looking back at this article now, I’d definitely do some things slightly differently and debug more efficiently. Nevertheless, I’ll just leave this article here ad verbatim, in hopes that it might help someone that is dealing with the same issues 🙂. All the best!
Background
So recently, I started using Linux again, and this time my distro of choice is Manjaro Linux XFCE. It has been great so far and I’ve been loving Linux and how easy it is to install and update software packages (the AUR is a godsend).
Today, I decided that I should configure my desktop to be able to type in Chinese. I thought it would be a rather simple process (like just enabling some settings in XFCE) however it turned out that I needed to install fcitx and configure it. Not really that hard in the world of Linux, but the instructions I found online didn’t really work for me and I couldn’t for the life of me figure out how to get it to work. (Forgive me because I am terrible at Linux)
So I spent the past few hours trying to figure out how to get fcitx to work on Manjaro XFCE, and it is finally working! I made this post in hopes that I will save you some trouble, if you are trying to achieve the same thing on Manjaro / any other similar XFCE / GTK-based Desktop environments.
Steps
Before I start, I followed some of the steps here http://echoyun.com/2017/10/02/installing-fcitx-chinese-ime-arch-linux/ but still couldn’t get it to work. The reason why I can follow this set of instructions is because Manjaro is based on Arch Linux, hence instructions for Arch Linux will probably work for Manjaro as well. My steps will be very similar to some of the steps here but I will tell you where it goes wrong.
Installing Fonts
Visit https://wiki.archlinux.org/index.php/Fonts#Chinese.2C_Japanese.2C_Korean.2C_Vietnamese and install the fonts required for Asian languages using the command below:
yay -Syu adobe-source-han-sans-otc-fonts adobe-source-han-serif-otc-fonts Installing fcitx and other dependencies
There are three pieces of software to be installed: the fcitx itself, one or more IMEs of your choices (I chose fcitx-googlepinyin) and a couple of input method engines for various toolkits (gtk2, gtk3, etc.). For convenience, they can be installed as a bundle by group fcitx-im. I also installed a GUI configuration tool (fcitx-configtool), which is not mandatory but makes my life a little bit easier.
yay -Syu fcitx fcitx-googlepinyin fcitx-im fcitx-configtoolConfiguration
Here comes the tricky part. I followed the other guide where the instructions asked me to add
export GTK_IM_MODULE=fcitx
export QT_IM_MODULE=fcitx
export XMODIFIERS=@im=fcitx
to ~/.xinitrc, which I did, and then logout and login, but I realised that the commands were never executed. I kept running echo $XMODIFIERS in my bash shell for it to output nothing. I added a echo hello >> isthiscommandrun to .xinitrc as well hoping that I would see the file in my home directory after I login (to see if .xinitrc has been sourced upon login), but it never showed up. In fact, the isthiscommandrun file only showed up after I ran bash .xinitrc or if I ran startx, just not at start-up.
Would this be a big problem? I tried running fcitx after logging in and out to try if it works. Guess what, it works!… except that it only works in certain applications like my Xfce whisker bar (the “Start Menu”) and Firefox. It somehow just doesn’t work in applications like Telegram Desktop.
I was determined to get the 3 variables above set properly upon startup. I tried adding the 3 lines to ~/.bashrc but ~/.bashrc is only sourced when a bash shell is started, meaning it still doesn’t set the variables on login. This is still a problem as, if were to set the 3 variables only after I login, the variables are only limited to the bash shell it is executed in, while setting it at startup allows all child processes in the desktop environment to inherit the variable.
So after lots and lots of tinkering about, I finally found the trick to this. What you need to do is add these 3 lines of code (same as above):
export GTK_IM_MODULE=fcitx
export QT_IM_MODULE=fcitx
export XMODIFIERS=@im=fcitx
to /etc/profile. Remember to run your favourite text editor with sudo to be able to save changes to /etc/profile as root.
Logout and login and your fcitx should be working!
Troubleshooting
If you still can’t get fcitx to work with Manjaro XFCE, check if you have added the Google Pinyin IME to the list of input methods, as seen here:
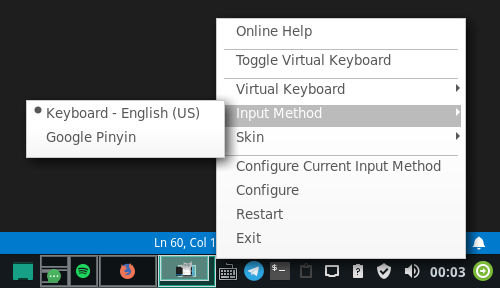
If you do not see Google Pinyin on the list here, run fcitx-configtool to add Google Pinyin as one of the input methods.
If it still doesn’t work, then run fcitx-diagnose and see if there are any red warnings that might be stopping fcitx from working properly.
Learning
As I am really still quite new to Linux, the past few hours has been rather torturous but I got a better idea of what dot files are sourced at what instances (at console login, after the display manager runs, etc.). In fact, this site https://mywiki.wooledge.org/DotFiles gives a pretty good documentation on this topic.
Do let me know if there is anything wrong with my approach or if there is anything that can be improved!